1. When I build stuff, I get exactly what I want and how I want it.
2. It usually, and I emphasize "usually" costs a lot less than purchasing a finished product.
3. It solves a problem that I needed to solve.
4. It can be fun to build stuff. Sometimes.
Now this is not say, go out and build everything. Somethings are just not worth building. But some things really are. This just so happens to be one of those things. I looked at the prospect of purchasing a "FigRig" (a trademarked name by the way, as well as a patented product.) But for me at the time, it just seemed too cost prohibitive. It is a great tool. It is diverse. It is functional. It is a very slick piece of equipment.
What does it do? It's primary function is to help stabilize the camera or camcorder. Hence, for those quick and short shots where you need to be walking, moving, turning, bending or any other contortionist move, this thing will let you do so without being tied down to a tripod, yet still produces a pretty stable looking shot. Heck, I have had lots of luck with this not too long ago while shooting a music video inside a night club with lots of people dancing. I needed to "fly through" the crowd on the dance floor for several shots. This was the solution, but I didn't have the budget for it. So I built one myself.
Don't laugh, but this thing cost me less than a 100 bucks. But it is as solid as anything out there that you could find. The really cool thing about it - it is super flexible in regards to anything I want to attach to it. So here's the list of goods or parts I used. The details on how to put this together - well, I will let you figure that out as you may just come out with version 2 - and make it even better. But here is a start.
- I bought and old beat up bike at a yard sale - $20.00 - I really only need one of the wheels from it, but as turns out I was able to use both and the front wheel fork and steering tube (or whatever that is called) as well - but that was yet for another DIY project that I may also talk about sometime.
- I removed the back wheel, cut off all the spokes, removed the tire and the liner - now I have my "ring" - it's light, it's solid, it's aluminum and best of all, it already has a ton of holes in it from where the spokes were.
- I purchased some square extruded aluminum at my local hardware store as well as some flat as well - I think 1/2" x1/2" and 1/2" x1/8" respectively - they typically come in 2' or 4' lengths - this is for the cross bar as well as for sturdiness and support. I bought double of the 1/2" x 1/8" as it was going to lay on top and bottom of the 1/2"x1/2" cross bar and be "sandwiched" with screws on the outer ends. Then I simply hand bent the 1/2"x1/8" to somewhat fit the curvature of the inside of the wheel. Also it made me feel super strong in doing so. :)
- Then I spend big bucks on the plate and plate mount. I think I paid around 60 buck for that, maybe less. In selecting which plate, my needs were simple. It needs to be fairly thin. It needs to have a bubble level. It needs to have the capability to mount the plate forward or reverse as well as in a range of position for balance. Oh, and it really needs to lock!
- I knew going in that I would be using both my Canon T2i and my Sony A1U on this, so I wanted to have lots of flexibility. I can move the plate and lock it in many positions to get as close to center of gravity or balance for pretty much any camera. But I now also have inside the bike rim, a channel that I can run wire through, after I wrap the left and right side with - yup, you guessed it - pipe insulation foam. The type you get at your hardware store for a couple of bucks for a 10 foot length. It is that dark gray foam that actually glues itself together on a seam. Of course, I only need short pieces for where I will be holding this thing. But cable will hold nicely underneath this inside the channel. I used some electricians tape on the ends to keep this all in place as well.
- One more thing - before mounting anything, you might want to give this "rig" a coat of black flat spray paint. Or, hot pink if you feel like it. But remember, this thing should not be reflecting into your lens ever - so black is preferable.
- I know this is just a quick overview and not step by step - but as I said at the beginning - you may come up with even better concepts or ideas yet. Let me know if you do.
 | ||
| The VaderVideo Rig - Looks like something out of StarWars eh? |
 | ||||
| Fully loaded - the rig, not the guy! - There is a mounted Tascam audio recorder at the bottom. T2i with shotgun mount and mic with dead cat cover. On top of the VV rig is yet another optional mic mount. |
 | |
| This thing really gets people's attention. |
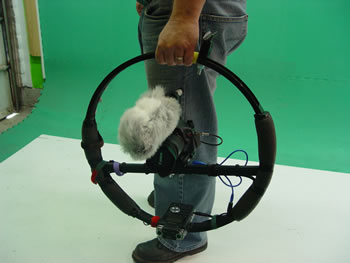 |
| Very versatile and easy to carry around. |
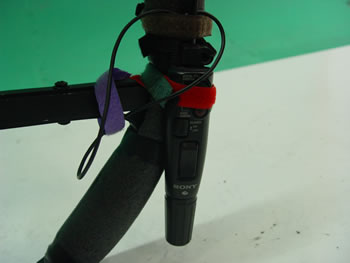 |
| I can add stuff with simple velcro straps - such as this LANC Sony remote controller handle (for my A1U) that I simply took off the Sony tripod temporarily. It sits in perfect position for my right hand to control the camera. |
 | ||
| So you can "steer" or rotate the camera as you are walking and "float" past things or people. Very cool. |
Here is just one example of footage shot with a Canon T2i while "flying through" in one of the night club scenes. (clicking this link opens a new window)
- Or see a whole collection of clips using this rig, here.

No comments:
Post a Comment